Part 2 - Setting Up Harbor as an Image Registry
Installing Tanzu Mission Control Self-Managed Series
- Part 1 - Introduction and Environment Details
- Part 2 - Setting Up Harbor as an Image Registry
- Part 3 - Configuring Okta as Identity Provider
- Part 4 - Configuring Other Prerequisites
- Part 5 - Tanzu Kubernetes Grid Cluster Setup
- Part 6 - Installing Tanzu Mission Control Self-Managed
Harbor Image registry
We need an image registry to host TMC Self-Managed images and packages. Harbor is the registry of choice here. If you already have a Harbor registry configured you can skip this post. We will be deploying Harbor using OVA which is now shipped as part of TKG. A few key considerations before we move forward with the installation
- A minimum storage of 10GB is recommended for Harbor
- Authenticated registries are not supported at the time of writing this post. A public project on Harbor is required
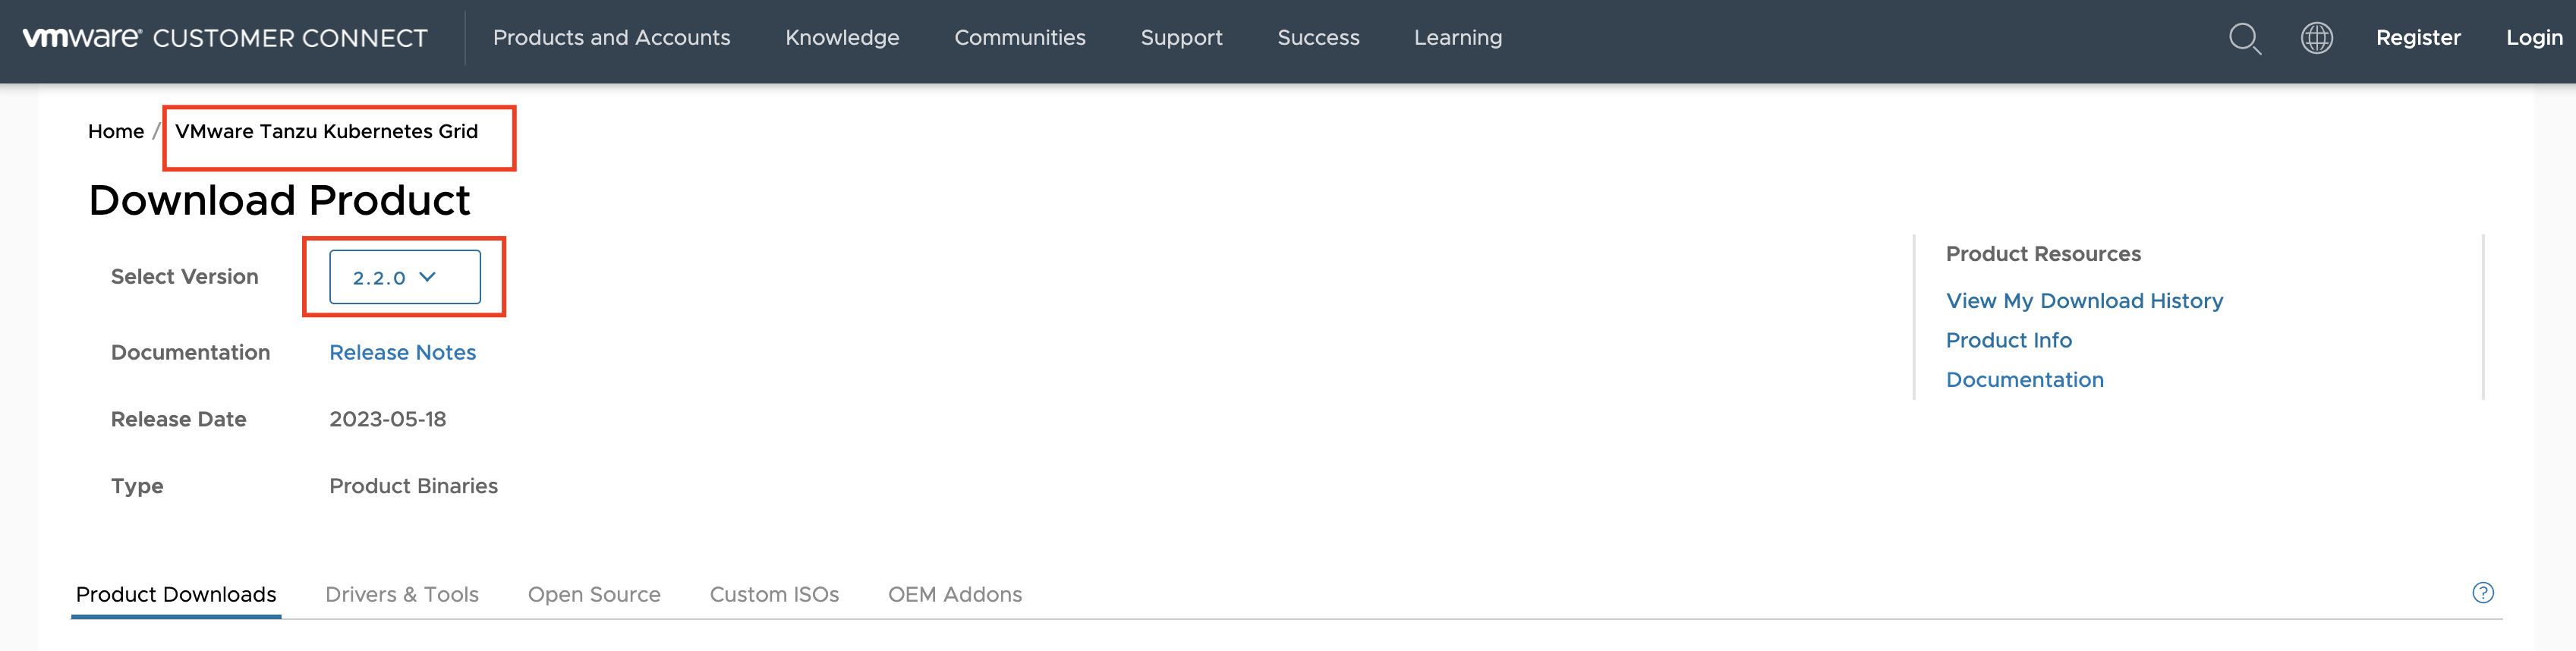
Download the Harbor OVA
- Log in to VMware Customer Connect
- On the Tanzu Kubernetes Grid downloads page
- Go to Downloads.
- Select Version 2.2.0.
- Scroll to the section labeled Harbor OVA, and click Download

Deploy Harbor
If you prefer using vCenter UI to deploy Harbor OVA, the VMware documentation has a very detailed guide to achieve this via UI. In this post, I'm going to present an alternate approach that leverages govc CLI for deployment.
Installing govc
Installation of govc is pretty straightforward and it is a very powerful tool to interact with vSphere APIs. To install govc on a Linux jumpbox follow the steps below
govc_url="https://github.com/vmware/govmomi/releases/download/v0.30.5/govc_Linux_x86_64.tar.gz"
wget -nv ${govc_url}
tar -xzvf govc_Linux_x86_64.tar.gz
chmod +x govc
sudo mv govc /usr/local/bin/govc
govc version
Setup govc
To use govc you will need to setup some environment variables. Once the variables are exported you can use govc about to verify if govc is working
export GOVC_URL=192.168.10.20 # vCenter IP
export GOVC_USERNAME=administrator@vsphere.local # vCenter username
export GOVC_PASSWORD=secretpassword # vCenter password
export GOVC_DATACENTER=Datacenter
export GOVC_CLUSTER=Cluster
export GOVC_DATASTORE=vsanDatastore
export GOVC_INSECURE=1
Configure Harbor OVA Spec File
As we are using govc CLi to configure vApp properties we are going to create a spec file for the OVA. Then use that spec file to upload and configure Harbor OVA.
We need to set the following environment variables which are later used in Harbor OVA configuration. The variables below are used as follows
HARBOR_ROOT_PASSWORD- Password for the root user account on the VM, and it must be 8-128 characters long.HARBOR_HOSTNAME- FQDN which you can use later to access Harbor. Cannot be an IP address or localhost.HARBOR_ADMIN_PASSWORD- Password for Harbor admin user. Used to access Harbor UI and pull/push images. Must be 8-128 characters longHARBOR_DB_PASSWORD- Password for the Harbor internal database. Must be 8-128 characters longHARBOR_IP- IP that you want to assign to the Harbor VMHARBOR_NETMASK- Netmask for the network hosting the Harbor VMHARBOR_GATEWAY- Gateway for the network hosting the Harbor VMHARBOR_DNS- DNS Server to be used by the Harbor VMHARBOR_DNS_DOMAIN- DNS Domain to be used by the Harbor VMHARBOR_NETWORK- vSphere Network name where Harbor VM will reside
export HARBOR_ROOT_PASSWORD='Admin!23'
export HARBOR_HOSTNAME='harbor.debuggingmode.com'
export HARBOR_ADMIN_PASSWORD='Admin!23'
export HARBOR_DB_PASSWORD='Admin!23'
export HARBOR_IP='192.168.10.10'
export HARBOR_NETMASK='255.255.255.0'
export HARBOR_GATEWAY='192.168.10.1'
export HARBOR_DNS='192.168.10.1'
export HARBOR_DNS_DOMAIN='debuggingmode.com'
export HARBOR_NETWORK='VM Network'
Generating the OVA spec
govc provides the capability to generate spec of an OVA using govc import.spec photon-4-harbor.ova > harbor-spec.json command. The spec file that is used here can be generated by expanding and copying the command below.
Expand and Copy to create OVA Spec File
cat << EOF > harbor-spec.json
{
  "DiskProvisioning": "flat",
  "IPAllocationPolicy": "dhcpPolicy",
  "IPProtocol": "IPv4",
  "PropertyMapping": [
    {
      "Key": "guestinfo.root_password",
      "Value": "$HARBOR_ROOT_PASSWORD"
    },
    {
      "Key": "guestinfo.allow_root_ssh",
      "Value": "True"
    },
    {
      "Key": "guestinfo.harbor_hostname",
      "Value": "$HARBOR_HOSTNAME"
    },
    {
      "Key": "guestinfo.harbor_admin_password",
      "Value": "$HARBOR_ADMIN_PASSWORD"
    },
    {
      "Key": "guestinfo.harbor_database_password",
      "Value": "$HARBOR_DB_PASSWORD"
    },
    {
      "Key": "guestinfo.harbor_scanner_enable",
      "Value": "True"
    },
    {
      "Key": "guestinfo.harbor_selfsigned_cert",
      "Value": "True"
    },
    {
      "Key": "guestinfo.harbor_ca",
      "Value": ""
    },
    {
      "Key": "guestinfo.harbor_server_cert",
      "Value": ""
    },
    {
      "Key": "guestinfo.harbor_server_key",
      "Value": ""
    },
    {
      "Key": "guestinfo.network_ip_address",
      "Value": "$HARBOR_IP"
    },
    {
      "Key": "guestinfo.network_netmask",
      "Value": "$HARBOR_NETMASK"
    },
    {
      "Key": "guestinfo.network_gateway",
      "Value": "$HARBOR_GATEWAY"
    },
    {
      "Key": "guestinfo.network_dns_server",
      "Value": "$HARBOR_DNS"
    },
    {
      "Key": "guestinfo.network_dns_domain",
      "Value": "$HARBOR_DNS_DOMAIN"
    }
  ],
  "NetworkMapping": [
    {
      "Name": "nic0",
      "Network": "$HARBOR_NETWORK"
    }
  ],
  "Annotation": "Harbor ova vSphere image - VMware Photon OS 64-bit and Harbor v2.7.1+vmware.1",
  "MarkAsTemplate": false,
  "PowerOn": true,
  "InjectOvfEnv": false,
  "WaitForIP": true,
  "Name": null
}
EOF
Importing OVA to vCenter
After spec file is created the OVA can be imported into vCenter using the below command
A successful import will give you a similar output
[14-07-23 20:12:18] Uploading photon-4-harbor-v2.7.1+vmware.1-dfd94f1401c510c355438a02521e72ce5e8042b5-disk-0.vmdk... OK
[14-07-23 20:12:18] Uploading photon-4-harbor-v2.7.1+vmware.1-dfd94f1401c510c355438a02521e72ce5e8042b5-disk-1.vmdk... OK
[14-07-23 20:12:18] Powering on VM...
[14-07-23 20:12:20] Waiting for IP address...
[14-07-23 20:13:06] Received IP address: 192.168.10.10
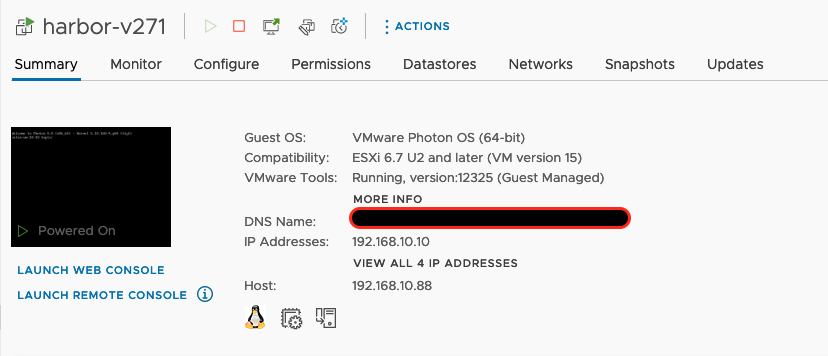
Verify Harbor VM in vCenter
Once the OVA import is finished you can verify that the VM is present in vcenter
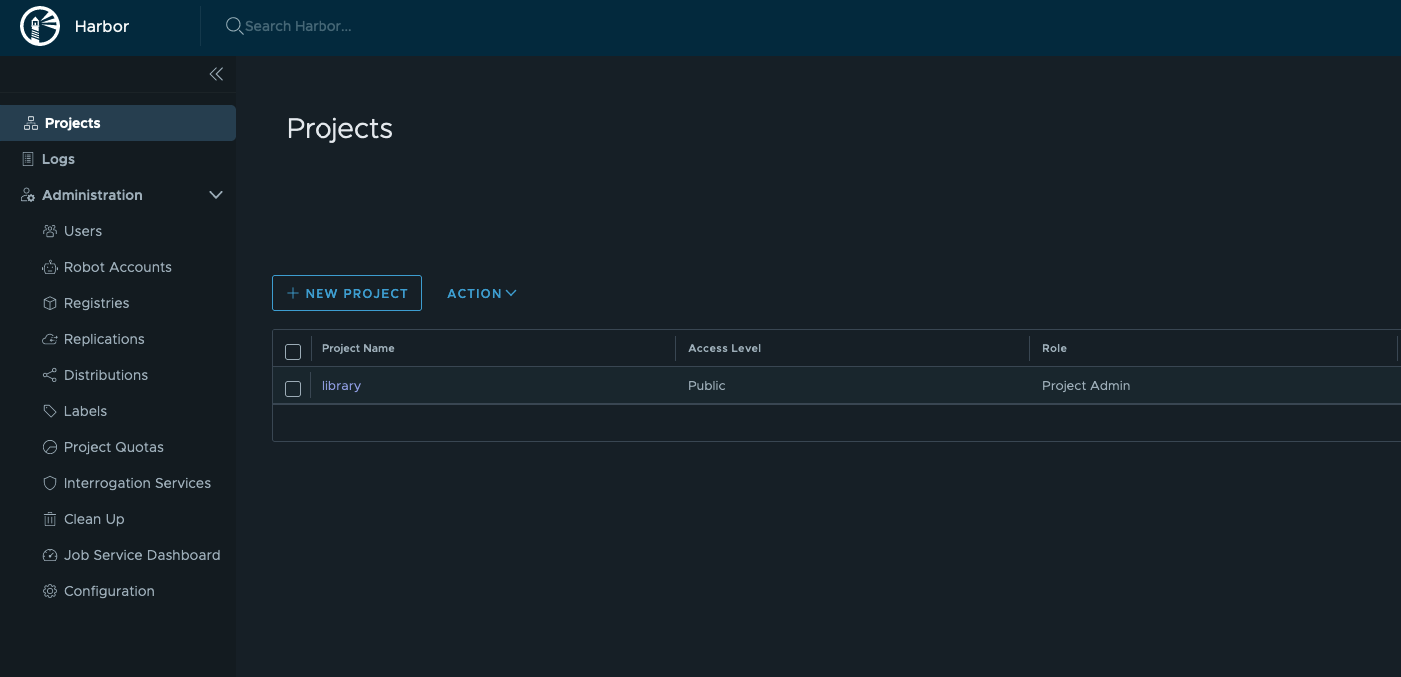
Verify Login to the UI
Harbor UI can be accessed using HARBOR_HOSTNAME set in the previous section. The default user is admin and password is set to the one defined in HARBOR_ADMIN_PASSWORD
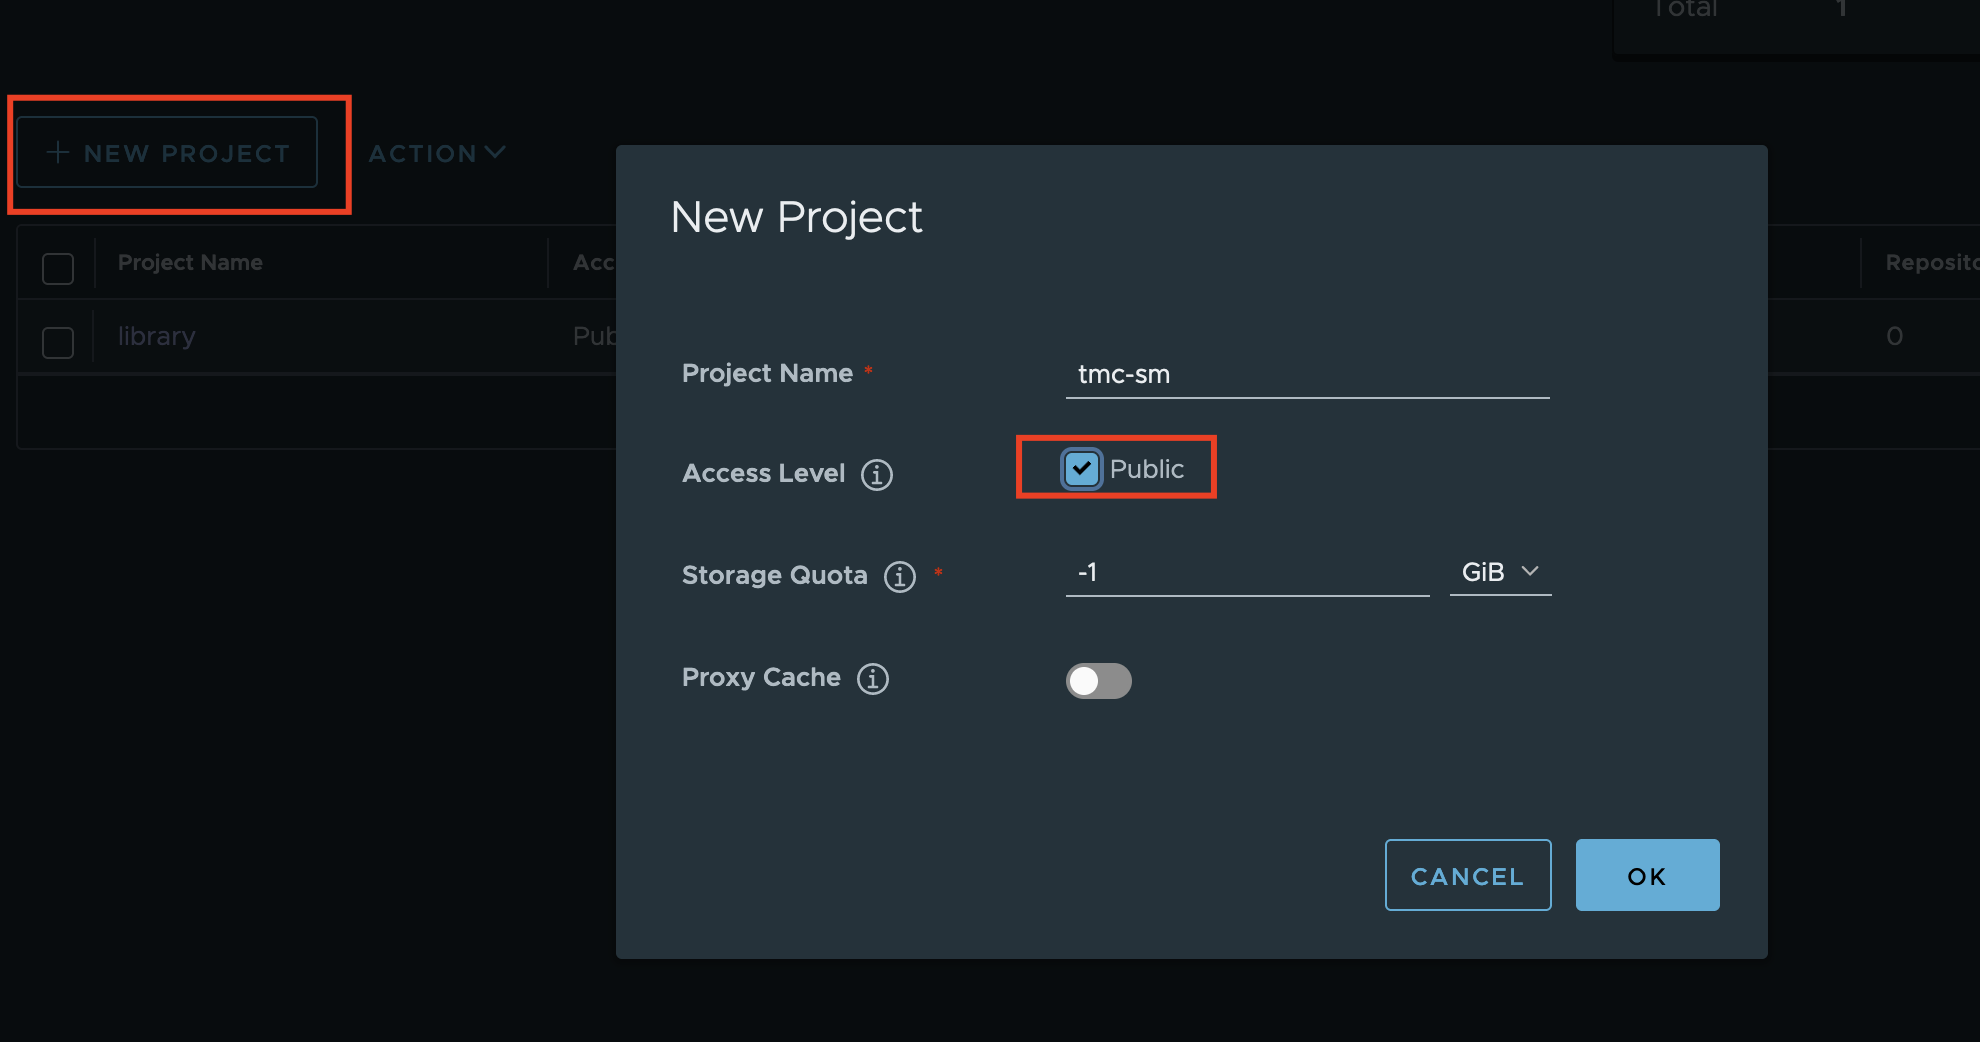
Create Project
We will use this project to host all TMC Self-Managed related packages and images. The steps to create Harbor project are pretty straightforward. Just make sure it's set to public.
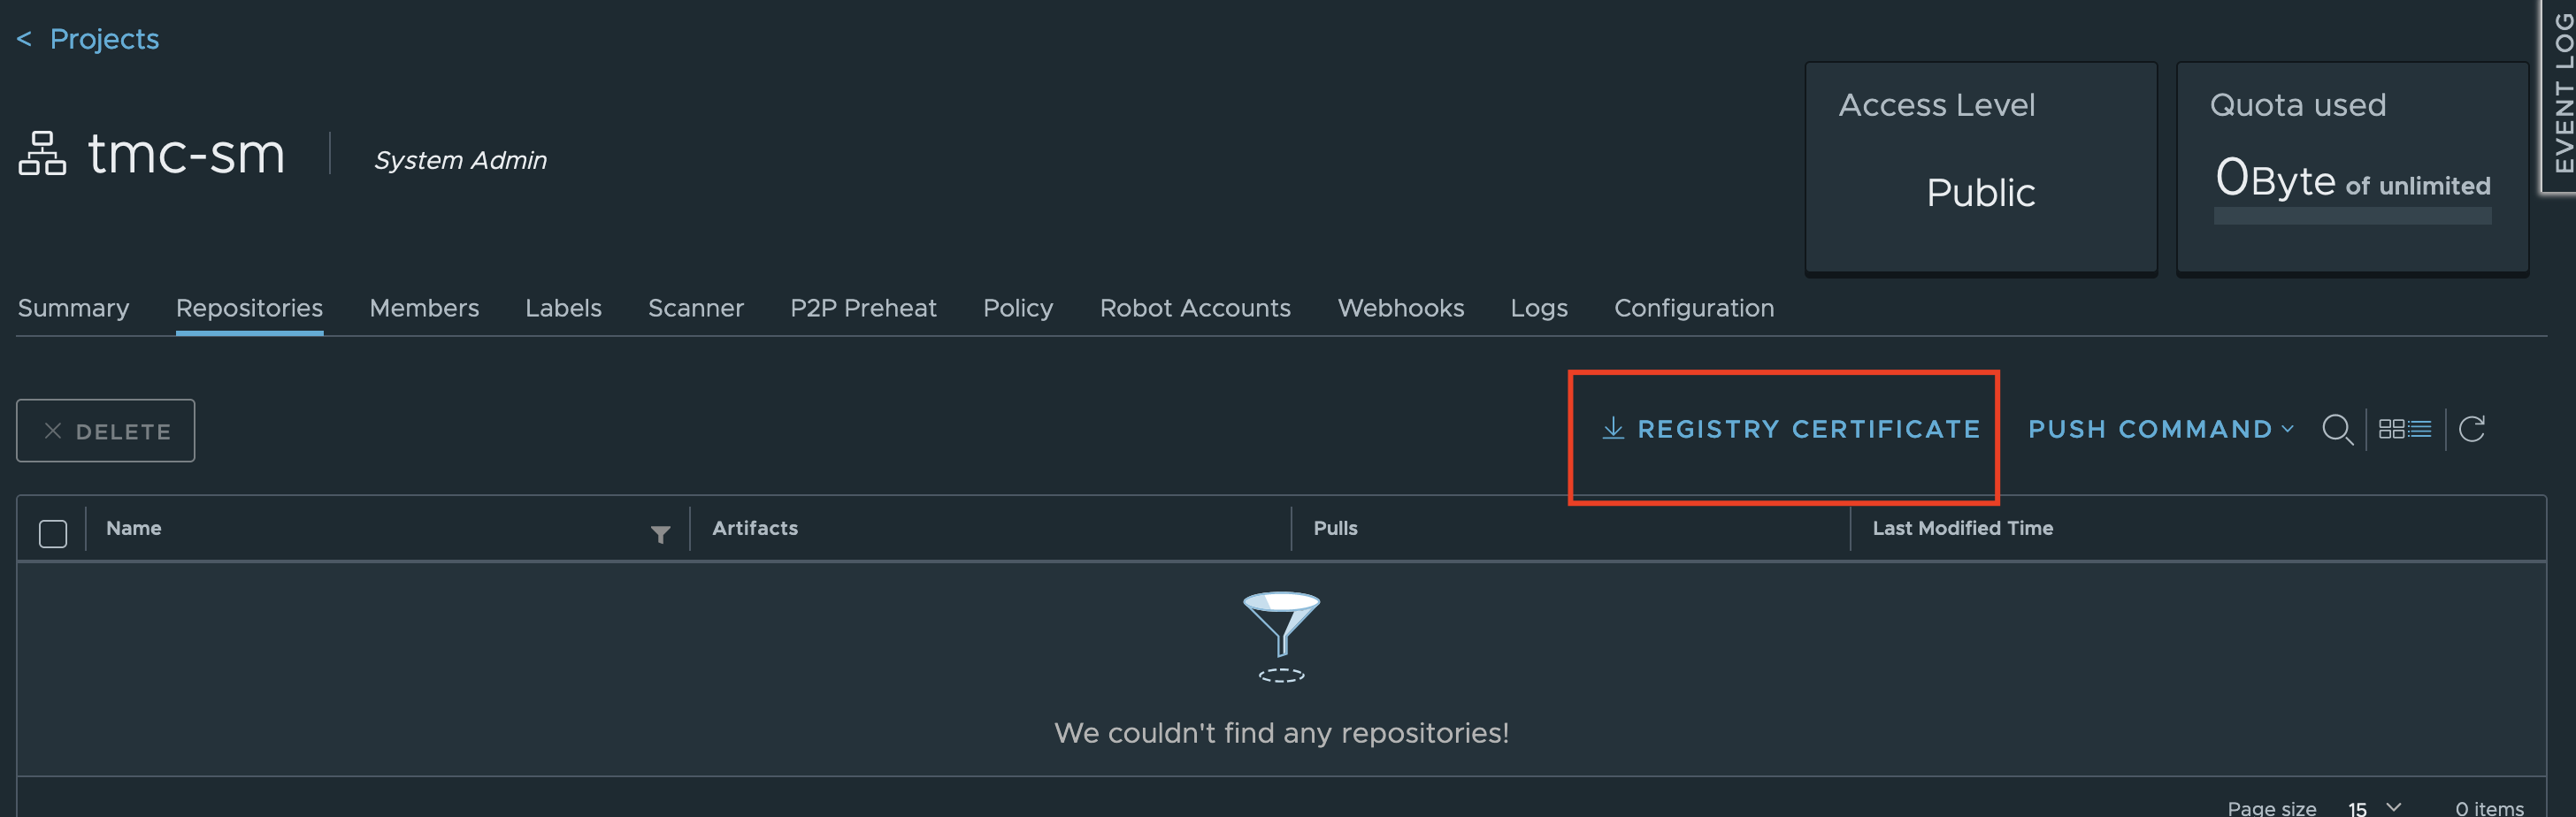
Get Registry CA Certificate
During Harbor deployment, we used an option to generate a self-signed certificate. We will need this CA certificate when configuring our Kubernetes Cluster and TMC Self-Managed
To get the certificate you can navigate to the newly created project and download the Registry Certificate. Save this file as harbor-ca.crt on your jumpbox.
The default generate certificate should give you something like this.
openssl x509 -in harbor-ca.crt -noout -dates -issuer -subject

notBefore=Jul 15 00:14:21 2023 GMT
notAfter=Jul 12 00:14:21 2033 GMT
issuer= /C=CN/ST=PEK/L=BeiJing/O=VMware/CN=HarborCA
subject= /C=CN/ST=PEK/L=BeiJing/O=VMware/CN=HarborCA
Add Harbor CA to jumpbox
Each operating system has different steps to do it. In this setup, we are using CentOS and the below steps can be used